Pixelating images in Python

Generating pixel art with AI has mixed results, but I’ve found you can improve the output with some basic heuristics. Last year I wrote several libraries for this and then stuffed them in a drawer, but since there’s been some interest in the topic: here’s how to make AI-generated pixel art a bit better with good ol’ image processing.

I’m going to use Python and, if you’d prefer not to write it yourself, I created a public colab that you can just step through.

We’re going to use OpenCV for image processing, which has an interesting Python API (it’s actually a C++ library and it shows).

# If you're using colab, no need to install anything. If you're 
# running locally, run:
# $ pip install opencv-python-headless
# You'll also need numpy.
import cv2 as cv

img = cv.imread(path_to_your_jpg, cv.IMREAD_UNCHANGED) 
print(img.shape)

This should show the dimensions of the image you uploaded. (If you get an exception about not being able to access shape on None, you probably didn’t put in the right path. Try using the absolute path to the file.)

I’m using the Wikipedia image for Neuschwanstein Castle:

Let’s see how pixel-y we can get it!

img is basically a three dimensional array (height x width x color). That is, you can access any given pixel’s color by looking at its (y, x) coordinate:

> img[123][45]
array([243, 218, 176], dtype=uint8)

You can see the image by just running “img” in colab. However, you’ll notice that the colors are off and it looks slightly post-apocalyptic:

# If you run:
img
# you get:

This is because OpenCV assumes that pixel color is ordered blue-green-red, not RGB, so it’s swapping reds and blues. (This is apparently a historical accident based on how camera manufacturers did things.) We can swap the colors back to “normal” by using cv’s color transformation function:

img = cv.cvtColor(img, cv.COLOR_BGR2RGB)
# Display the image again. Should look normal now, color-wise.
img

Okay, now we can actually get into image processing! First, we’re going to handle the issue where AI generated images tend to use too many colors for pixel art. I found seven colors was a good sweet spot for pleasingly-retro-but-still-has-nuance, but you can experiment. More colors looked “too detailed” and fewer colors started losing shapes that I wanted. (Heuristically determining a good number of colors from the image’s size and complexity is left as an exercise to the reader.)

So you have seven buckets. For each pixel in the image, which color bucket should you put it in? And what should the colors be? Luckily, we don’t have to figure this out ourselves: an algorithm called k-means clustering figures out what sensible buckets would be, based on the data, and clusters our data into these buckets.

However, first we need to munge our data a little. As mentioned above, img is currently a three-dimensional array (so something like 100 x 200 x 3). We just want to pass the clustering algorithm a list of colors, so we want to flatten our 3D array into a flat list of 20,000 x 3 (100*200=20,000):

import numpy as np

# Magic incantation to flatten the array.
pixels = img.reshape((-1, 3))
# Values are currently uint8 type. Clustering only works on 
# floats, so convert.
pixels = np.float32(pixels)

Now we actually call the k-means function. I’ve attempted to give variables sensible names, but OpenCV is not making this easy to understand:

num_colors = 7
termination_criteria = cv.TERM_CRITERIA_EPS + cv.TERM_CRITERIA_MAX_ITER
num_iter = 10
epsilon = 1.0
criteria = (termination_criteria, num_iter, epsilon)

correctness, clusters, centers = cv.kmeans(
    data=pixels, K=num_colors, bestLabels=None, criteria=criteria, attempts=10,
    flags=cv.KMEANS_RANDOM_CENTERS)

The important data returned is the centers (i.e., the color assigned to each bucket) and the clusters (a mapping of each pixel to the bucket it belongs in). We can draw the chosen colors as a nice palette:

palette = np.zeros((100, 100 * len(centers), 3), np.uint8)

for i, color in enumerate(centers):
  cv.rectangle(
      palette, (100 * i, 0), (100 * (i + 1), 100), color.tolist(), -1)
palette

Then we can do some *magic* (of the matrix variety) and mush our mapping of pixel-to-bucket back into a height x width x color array:

# Map each pixel to the correct color for its bucket.
bucketed_img = centers[clusters.flatten()]
# Reshape into the original image's shape.
bucketed_img.reshape((img.shape))
# Let's see what we got:
bucketed_img

Nice! That’s already looking more like pixel art. Look at that sky “gradient” with those clouds. There’s plenty more we can do: the palette has several very similar colors and there are a bunch of “compression artifacts” from removing colors (e.g., the tip of the tallest steeple), some of which I’ll cover fixing in my next post. But regardless, with a few lines of code, you can turn any image into “pixel art” (of dubious quality).

Login via command line

I’m working on a command-line tool that will require user login, so I wanted to have the flow that all the snazzy command-line clis use: pop up a browser window and ask you to login with <known provider>, then pass back something to the command line. Unfortunately, I had no idea what this type of login was called or how to do it.

This article was great, and went through enough of the flow that I got the idea and finished it up on my own. The (kind of ridiculous) flow is:

  • Start a local webserver.
  • Open a browser pointing to the platform you want to use to login.
  • …passing the local webserver’s address in as the redirect for post-login.
  • Receive the response on the webserver and parse it.

I’m using Python, so in more detail: first we start a local webserver. I’m doing this in a separate thread, because I need to do some other work while the webserver is handling stuff.

import http.server
import threading

class LoginManager:
  def __init__(self):
    self._server = None
    self._port = 0

  def start_web_server(self):
    """Kick off a thread for the local webserver."""
    th = threading.Thread(target=self._start_local_server)
    th.start()

  def _start_local_server(self):
    self._server = http.server.HTTPServer(('localhost', 0), Handler)
    self._port = self._server.server_port
    print(f'Serving on port {self._port}')
    self._server.serve_forever()

_start_local_server is the interesting part here. I don’t want to risk bumping into a port conflict (imagine how confusing it would be to not be able to log into a website because you happened to be running some emulator), so I’m going to make the OS give us an open port. Also, we only want the server to listen to localhost (no outside traffic). The pair ('localhost', 0) is the host and port, which binds the server to only accept requests to localhost and says “give me an open port.”

Because we’re not specifying a port, we then have to figure out what port we’re using. So I immediately ask the server what port was chosen (and then print it, for my own debugging).

Next up, we need to open a browser.

  def open_browser(self):
    """Opens the browser to the login page."""
    # Waits for the server to start.
    while self._server is None:
      time.sleep(1)
    url = self.create_login_url()
    system = platform.system()
    if system == 'Darwin:
      cmd = ['open', url]
    elif system == 'Linux':
      cmd = ['xdg-open', url]
    elif system == 'Windows':
      cmd = ['cmd', '/c', 'start', url.replace('&', '^&')]
    else:
      raise RuntimeError(f'Unsupported system: {system}')
    subprocess.run(cmd, check=True)

This is just copied from the article I linked above. I’m on Darwin and it works great, YMMV.

The URL is returned from create_login_url. This is where the article leaves us to our own devices. My default device is “Google probably has a free service that does this,” which seems to be true for this case. I created a new client credential under “OAuth 2.0 Client IDs”

In the client’s configuration you have to specify “Authorized JavaScript origins” and “Authorized redirect URIs.” We want URIs that match http://localhost:N, where N is going to change each run. However, the ? sternly warns you against URIs containing wildcards, so how do we specify N? The answer is: don’t. Turns out this is a prefix match, so put “http://localhost&#8221; in the questionable-named “URIs 1” for each section. This does mean that you have to serve the redirect from root (e.g., you have to redirect to localhost:12345, not localhost:12345/login-success-page), but this is just a scratch server for handling this one request, so that shouldn’t be a huge deal.

Armed with this configuration, we can now implement the URL gen function:

  def create_login_url(self) -> str:
    """Generate the login URL."""
    nonce = hashlib.sha256(os.urandom(1024)).hexdigest()
    return (
      'https://accounts.google.com/o/oauth2/v2/auth?'
      'response_type=code&'
      f'client_id={_CLIENT_ID}&'
      'scope=openid%20email&'
      f'redirect_uri=http%3A//localhost:{self._port}&'
      f'nonce={nonce}')

Another stern warning that we’re ignoring is that the docs “highly recommend” passing a “state” parameter. The docs assume you’re using this flow to have users log into your website, so your server has to be cautious that it’s getting a response from your actual user, not a man-in-the-middle attacker. However, we are running this direct from command line to Google, so using the state doesn’t make a lot of sense.

The final piece is to actually handle that redirect request from the browser. The browser passes back the ID token as a base64-encoded cookie, so we can use Python’s built-in libraries to extract it:

class Handler(http.server.SimpleHTTPRequestHandler):
  """Handle the response from accounts.google.com."""

  # Sketchy static variable to hold response.
  info = None

  def do_GET(self):
    c = http.cookies.SimpleCookie(self.headers.get('Cookie'))
    jwt = c['idToken'].value
    if not jwt:
      # If the server gets a non-login request.
      return
    # Google's cookie comes in the format: "[header].[idToken]."
    # where [header] and [idToken] are base64 encoded. However,
    # "." isn't a base64 thing, so we have to split up the 
    # cookie before decoding.
    pieces = jwt.split('.')
    info = None
    for piece in pieces:
      # The base64 might not have enough padding for Python's
      # decoder to roll with (JS is fine with it, but Python
      # needs a couple of extra trailing =s).
      i = base64.b64decode(f'{piece}==').decode('utf-8')
      info = json.loads(i)
      if is_header(info):
        continue
      # Otherwise, "info" is the value we want! Actually do
      # something with it here:
      do_something_with(info)
      break
    self.wfile.write(b'All set, feel free to close this tab')

def is_header(info: dict[str, Any]) -> bool:
  return 'alg' in info and 'typ' in info

This is full of gross little implementation details. I’ve tried to comment on them above. info looks something like:

{
  'name': 'Alice Doe', 
  'email': 'adoe@example.com', 
  'email_verified': True, 
  'auth_time': 1659727260, 
  'user_id': '...', 
  'firebase': {
    'identities': {
      'email': ['adoe@example.com'], 
      'google.com': ['<long string>']
    }, 
    'sign_in_provider': 'google.com'
  }, 
  'iat': 1659727260, 
  'exp': 1659730860, 
  'aud': 'lien-288519', 
  'iss': 'https://securetoken.google.com/<your project>', 
  'sub': '...'
}

Then we just have to put this all together:

def main(argv):
  m = LoginManager()
  m.start_web_server()
  m.open_browser()
  # Probably do something with info here, and shutdown the 
  # server.

if __name__ == '__main__':
  app.run(main)

Now when we run, it’ll create a server, pop open a browser, wait for us to log in, then redirect back to the server we just started, show a polite message to the user in the browser, and we can do something with the user’s token.

Generating Voronoi cells in Python

Voronoi cells are basically the shape you see soap suds make. They have a lot of cool properties that I wanted to use for image generation, but I didn’t want to have to figure out the math myself. I found this really excellent tutorial on generating Voronoi cells, which goes into some interesting history about them, too!

However, the Python code was a little out-of-date (and I think the author’s primary language was C++), so I wanted to clean up the example a bit.

It’s always a little tricky combining numpy and cv2, since numpy is column-major and cv2 is row-major (or maybe visa versa?) so I’m doing a rectangle instead of a square to make sure the coordinates are all ordered correctly. I started with some initialization:

import cv2
from matplotlib import pyplot as plt
import numpy as np

random.seed(42)
width = 256
height = 128
num_points = 25

Then we can use the Subdiv2D class and add a point for each cell:

subdiv  = cv2.Subdiv2D((0, 0, width, height))

def RandomPoint():
  return (int(random.random() * width), int(random.random() * height))

for i in range(num_points):
  subdiv.insert(RandomPoint())

Then it just spits out the cells!

# Note that this is height x width!
img = np.zeros((height, width, 3), dtype=np.uint8)

def RandomColor():
  """Generates a random RGB color."""
  return (
    random.randint(0, 256), 
    random.randint(0, 256), 
    random.randint(0, 256))

# idx is the list of indexes you want to get, [] means all.
facets, centers = subdiv.getVoronoiFacetList(idx=[])
for facet, center in zip(facets, centers):
  # Convert shape coordinates (floats) to int.
  ifacet = np.array(facet, int)

  # Draw the polygon.
  cv2.fillConvexPoly(img, ifacet, RandomColor(), cv2.LINE_AA, 0)

  # Draw a black edge around the polygon.
  cv2.polylines(img, np.array([ifacet]), True, (0, 0, 0), 1, cv2.LINE_AA, 0)

  # Draw the center point of each cell.
  cv2.circle(
    img, (int(center[0]), int(center[1])), 3, (0, 0, 0), cv2.FILLED, cv2.LINE_AA, 0)

Finally, write img to a file or just it display with:

plt.imshow(img)

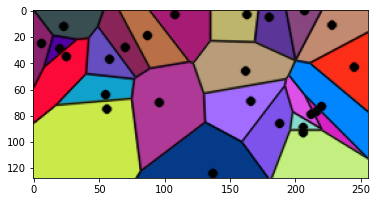
If you use 42 as the seed, you should see exactly:

How to set up Python on Compute Engine

This is a followup to my previous post on setting up big files on GCP. I ran into similar problems with Python as I did with static files, but my solution was a bit different.

The right wayTM of running Python on GCP seems to be via a docker container. However, adding a virtual environment to a docker container is painful: for anything more than a small number of dependencies and the docker image becomes too unwieldy to upload. Thus, I decided to keep my virtual environment on a separate disk in GCP and mount it as a volume on container startup. This keeps the Python image svelte and the virtual environment static, both good things! It does mean that they can get out of sync: technically I should probably be setting up some sort of continuous deployment. However, I don’t want spend the rest of my life setting up ops stuff, so let’s go with this for now.

To create a separate disk, follow the instructions in the last post for creating and attaching a disk to your GCP instance. Make sure you mark the disk read/write, since we’re going to install a bunch of packages.

Start up the instance and mount your disk (I’m calling mine vqgan_models, because sharing is caring).

On your development environment, scp your requirements.txt file over to GCP:

gcloud compute scp requirements.txt vqgan-clip:/mnt/disks/vqgan_models/python_env/requirements.txt

Here’s where things get a little tricky, so here’s a high-level view of what we’re doing:

  1. Create a “scratch” Docker instance.
  2. Add our persistent disk to the container in such a way that it mimics what out prod app will look like.
  3. Install Python dependencies.

Virtual environments are not relocatable, so we need to make the virtual environment directory match what prod will look like. For instance, I’ll be running my python app in /app with a virtual environment /app/.venv. Thus, I am going to mount my persistent disk to /app in the scratch docker container:

docker run -v /mnt/disks/vqgan_models/python_env:/app -it python:3.10-slim bash

This will put you in a bash shell in a python environment container. Everything your create in /app will be saved to the persistent disk.

Note: when you want to leave, exit by hitting Ctrl-D! Typing “exit” seemed to cause changes in the volume not to actually be written to the persistent disk.

Now you can create a virtual environment that will match your production environment:

# Shell starts in /
$ cd /app
$ python3 -m venv .venv
$ . .venv/bin/activate
$ pip install -r requirements.txt

Hit Ctrl-D to exit the scratch docker instance. Shut down your instance so you can change your docker volumes. Go to Container -> Change -> Volume mounts and set the Mount path to /app/.venv and the Host path to /mnt/disks/vqgan_models/python_env/.venv.

On you development machine, set up a Dockerfile that copies your source code and then activates your virtual environment before starting your service:

FROM python:3.10-slim
WORKDIR /app
COPY mypkg ./mypkg
CMD . .venv/bin/activate && python -m mypkg.my_service

Build and push your image:

$ export BACKEND_IMAGE="${REGION}"-docker.pkg.dev/"${PROJECT_ID}"/"${BACKEND_ARTIFACT}"/my-python-app
$ docker build --platform linux/amd64 --tag "${BACKEND_IMAGE}" .
$ docker push "${BACKEND_IMAGE}"

Now start up your GCP instance and make sure it’s running by checking the docker logs.

$ export CID=$(docker container ls | tail -n 1 | cut -f 1 -d' ')
$ docker logs $CID
...
I0917 01:24:51.654180 139988588971840 my_service.py:119] Ready to serve

Now you can quickly upload new versions of code without hassling with giant Docker containers.

Note: I am a newbie at these technologies, so please let me know in the comments if there are better ways of doing this!

How to get big files into Compute Engine

I’ve been working with some large models recently and, as a Docker beginner, shoved them all into my Docker image. This worked… sort of… until docker push started trying to upload 20GB of data. Google Cloud doesn’t seem to support service keys for docker auth (even though they claim to! not that I’m bitter), so I kept getting authorization errors. Time to figure out docker volumes.

First, I needed to create an additional disk. I essentially followed the directions in the docs. Using the console in your compute engine instance, under “Additional Disks” select “Add new disk” and fill in the size you want. The defaults are probably fine, although it defaults to SSD so you can select Standard if don’t care about speed.

Save the instance and start it up. Hit the “SSH” button once it’s booted. Then, find your new disk:

$ sudo lsblk
...
sdb         8:16   0   20G  0 disk

Then format the disk:

$ sudo mkfs.ext4 -m 0 -E lazy_itable_init=0,lazy_journal_init=0,discard /dev/sdb
$ sudo mkdir -p /mnt/disks/vqgan_models
$ sudo mount -o discard,defaults /dev/sdb /mnt/disks/vqgan_models

I then ran a quick test to make sure it’s actually a writable directory:

$ cd /mnt/disks/vqgan_models/
$ echo "hello world" > test.txt
$ cat test.txt
hello world

Woot! Time to transfer some real data. Following the docs, I ran:

gcloud compute scp models/vqgan/model.ckpt vqgan-clip:/mnt/disks/vqgan_models

After a long upload, I realized that I created the disk in the wrong data center. So if this happens to you: stop the VM, edit it to remove the disk (you have to detach the disk from the VM to modify its zone). Then move the disk:

gcloud compute disks move vqgan-models --zone=us-east1-b --destination-zone=us-central1-c

“zone” is the source zone and “destination-zone” is, more obviously, the destination zone. This probably incurred some cross-data-center-networking cost, but life’s too short to wait for SCP.

Then I edited my us-central1-c instance to add an existing disk. Annoyingly, it isn’t mounted on startup. GCP claims that you can add it to your /etc/fstab, but that was destroyed every time I restarted the instance. Thus, I instead went to “Edit” -> “Management” -> “Metadata” -> “Automation” -> “Startup script” and added the lines:

sudo mkdir -p /mnt/disks/vqgan_models
sudo mount -o discard,defaults /dev/sdb /mnt/disks/vqgan_models

I also managed to make my disk the wrong size. So, if you need to increase the size of your disk, run:

gcloud compute disks resize vqgan-models --size 40 --zone us-central1-c

Then ext4 doesn’t know about the new, bigger size yet, so SSH into your VM and run:

sudo resize2fs /dev/sdb

Now df -h should show “40G” as the size.

Now to actually mount this sucker as a docker volume. Shut the instance back down and go to “Edit”. Under “Container” select “Change” and select “Add Volume”. I want /mnt/disks/vqgan_models/pretrained to be mounted as /app/pretrained in the Docker container, so set “Mount path” to /app/pretrained and “Host path” to /mnt/disks/vqgan_models/pretrained.

Finally, it’s time to boot this up and try it out! Start the instance, hit the SSH button, find the docker container ID, and use that to check the filesystem in the container:

$ export CID=$(docker container ls | tail -n 1 | cut -f 1 -d' ')
$ docker exec $CID ls /app/pretrained
model.ckpt

Now you can (fairly) easily move big files around and attach them to your docker instances.

Note: I am a newbie at all of these tech stacks. If anyone knows a better way to do this, I’d love to hear about it! Please let me know in the comments.

Using Warp workflows to make the shell easier

Disclaimer: GV is an investor in Warp.

Whenever I start a new Python project, I have to go look up the syntax for creating a virtual environment. Somehow it can never stick in my brain, but it seems too trivial to add a script for. I’ve been using Warp as my main shell for a few months now and noticed they they have a feature called “workflows,” which seems to make it easy to add a searchable, documented command you frequently use right to the shell.

To add a workflow to the Warp shell, create a ~/.warp/workflows directory and add a YAML file describing the workflow:

$ mkdir -p ~/.warp/workflows
$ emacs ~/.warp/workflows/venv.yaml

Then I used one of the built-in workflows as a template and modified it to create a virtual environment:

---
name: Create a virtual environment
command: "python3 -m venv {{directory}}"
tags: ["python"]
description: Creates a virtual environment for the current directory.
arguments:
  - name: directory
    description: The directory to contain the virtual environment.
    default_value: .venv
source_url: "https://docs.python.org/3/library/venv.html"
author: kchodorow
author_url: "https://www.kchodorow.com"
shells: []

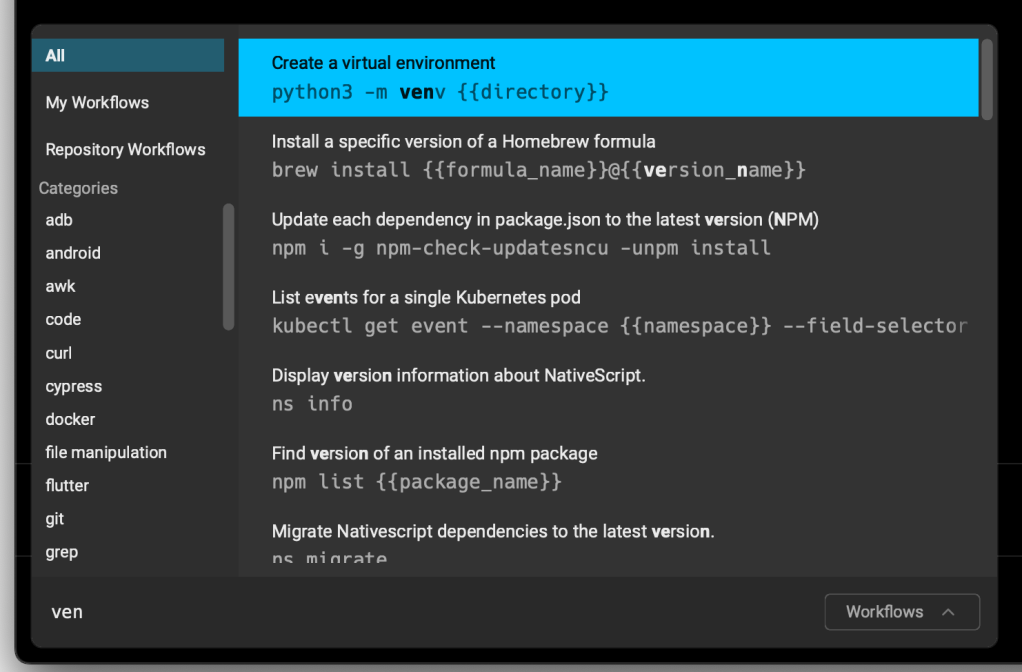
I saved the file, typed Ctrl-Shift-R, and typed venv and my nice, documented workflow popped up:

However, I’d really like this to handle creating or activating it, so I changed the command to:

command: "[ -d '{{directory}}' ] && source '{{directory}}/bin/activate' || python3 -m venv {{directory}}"

Which now yields:

So nice.

Update: I realized I actually always want to activate the virtual environment, but I also want to create it first if it doesn’t exist. So I updated the command to: ! [ -d '{{directory}}' ] && python3 -m venv {{directory}}; source '{{directory}}/bin/activate'". This creates the virtual environment if it doesn’t exist, and then activates it regardless.

Why market cap is dumb

When I was a kid, I went to a tag sale “for kids, by kids” where kids sold their junk/toys to other kids. I was wandering around and saw a shoebox filled to the brim with marbles. I went over and there was a sign on the box that said, “25 cents/marble”.

“How much for the whole box?” I asked the kid.

He thought for a second. He was around my age, maybe a little older. “$5,” he said.

“Sold!” I said quickly, handed him $5, and ran off with my hundreds and hundreds of marbles before he realized how deep a discount he had just given me.

Suppose there were 300 marbles in the box. The box “should have” cost 300*25 cents=$75. Obviously no one is going to pay $75 for a box of marbles, which brings us to the basic problem with market cap and the stock market.

The market cap of a company is basically the number of shares it has issued multiplied by price per share. However, if we think of a share as a marble, the market cap is that ridiculously inflated $75.

How much of this stock are people actually trading? Google, for example, has 723,000,000,000(ish) shares outstanding. Daily trading volume is around 1,500,000. That is .0002% of the outstanding shares. Translating that into marbles… that’s a lot less than one marble.

But let’s say a couple of people buy individual marbles, and then start trading them between themselves for 25 cents. Someone who hasn’t seen the kid’s booth offers a buyer 30 cents for a marble. Doing some quick math, people realize that marble boy’s net worth has gone from $75 to $90. “Hey, that kid just made $15. We should tax him on that.”

And that’s why a wealth tax is stupid.

Shoulders of Giants

I’ve been thinking a lot about construction. Taking a very specific part of the process, building the staircase: you find a carpenter and they build the staircase to your measurements. Generally your contractor will find someone with decent experience that they think will do a good job for whatever price you’re willing to pay and then you get as staircase executed at whatever skill level happens to be available/at that price point.

Construction Physics had an interesting point the other day: mass production took off in America because the United States didn’t have skilled craftsmen the way Europe did. This is also borne out by my Instagram feed, currently: European tradesmen seem to be more artistic and skilled than the Americans in my feed (sorry fellow countrymen). My guess is that Europe’s aristocracy supported spending 5000 man-hours on a staircase in a way that the United States really couldn’t compete with. And now maybe a continuing culture that values these skills more? I don’t really know.

Regardless, I was thinking about how different this is than software engineering. There’s always someone’s first staircase they’ve ever built, which is not going to be as good as the thousandth (I hope!). However, if there’s a common component in software engineering, someone will have already built it and it will be the product of many engineers’ thousandth try at building user login, logging, whatever. Thus, a junior engineer can use these solid building blocks to create their own first-try-mess on top of. However, that mess will (hopefully!) have a solid foundation.

Open source and APIs are an incredible superpower software engineers have over the physical world. It’s like installing a staircase that was built by every master-craftsman over the last 500 years. And generally, the best tools are accessible to everyone: Fortune 500 companies can use Stripe/Twilio/Mercurial the same way an individual developer with a hobby project can. At least in the realm of software engineering, it is a golden age of equality.

5-minute design: meme generator

When I’ve talked to people who’ve attempted to make meme tools, they say that search is a really hard problem. This sort of makes sense: one person might search “communism”, another “bugs bunny”, and another “we” trying to get this image template:

See Know Your Meme for context.

I was thinking about it today, though, and you know what? All of those people who’ve actually tried to build this are wrong. This is a super easy problem.

How this should work:

  • A user searches for a meme and doesn’t find it. Keep a record of the query (say it’s “communism”).
  • The same user uploads a meme. Now there is a strong possibility that the query the user did is a good match for the uploaded image, so associate that image with “communism” and give that pair a score of 1.
  • Now diff that image to others in the database using image recognition to find “equivalent” images. For gifs, I’m not too familiar with gif’s file format, but I assume something could be done generating frames of image. (There are a lot of assumptions here.)
  • Now associate that query with all “equivalent” images, plus the new image. Then take all of the query terms associated with the existing images and add them to the new image.

Next time someone searches for “communism”, show the meme template uploaded above. If they choose that template, increase the (template, "communism") pair score. Whenever someone searches, show them a mix of high-scoring templates for their search term, plus some prospective templates that are still “young.”

In the example above, I assume the user is trustworthy. There’s also a strong possibility that the user is a bot/malicious actor/both. So that users rep should be tied to whether others use that prospective template/query pair, and that feeds back into how much a user can affect a template’s score.

Since memes change over time, you probably also want to overlay some decay function, so if you search for “drake” you get the latest templates, not ones from years ago.

Now, assuming you have some users, you can set up a “self-labeling” system.

Easy peasy.

A review of GitHub Copilot

I’ve been using GitHub Copilot for Unity development and it is incredible. It has saved me from tons of bugs, speeded up my work by 2x, and even taught me a lot of C# (which Unity uses and I haven’t used before).

How does it work? You install it as a VS Code extension and then, as you type, it (very magically) suggests what should come next. For example, I have a very simple utility class with a static field, WorldWidth, to get the size of the screen in world coordinates. Suppose I wanted to add a WorldHeight field. I press enter, and I literally don’t even have to start typing:

It knows that this is the other function I’d likely want.

Okay, but that’s very simply. How about something more complex? This is a long function, so excerpting part of it, but it’s a nested for loop that looks at each column on the game board.

At the end of this function, I press enter and:

Note that bool lastIter went from y == board[x].Length - 1 to board.Length - 1. Fancy!

Its context-awareness is also great when you don’t want to have to look up math formulas:

(…it works for much more complicated math, too.)

And it saves tons of time writing out annoying debugging messages or ToString functions:

It also taught me C#’s $-formatting and rolls with other formats as you go, e.g., if you prefer (x,y) format.

The downside of using this is that I’m much more likely to repeat code, because I don’t have to write it all out. For example, in the GetVerticalRuns/GetHorizontalRuns functions above, I probably would have pulled out the loops into a common function if I had to write it myself. However, I also probably would have messed it up on the first try.

If you do any programming, I highly recommend signing up for Copilot. It takes away a lot of repetitive, annoying, and route work and lets you concentrate on actually getting your project working.